
Git and Unity: A Comprehensive Guide to Version Control for Game Devs


I have been using Git for version control for over 15 years. It’s been my constant companion on tiny personal projects, 20-person Unity projects, and even the massive Windows operating system. Git has become the de facto standard for the software industry, and it’s growing in popularity for Unity game development.
Git is actually easy to learn if you start from the fundamentals. In this guide, we’ll begin with the basics of setting up Git for Unity to track versions of your project. Then, we’ll move on to more advanced topics like backing up your project to GitHub, collaborating with a team, and sharing code and assets between multiple projects.
Quick Summary
If you’re short on time, here’s the high-level flow for Unity version control:
- Initialize a Git repository in your Unity project.
- Add a Unity-specific
.gitignoreso you don’t commit generated files. - Use Git LFS for large assets (textures, audio, video, models).
- Commit early and push to GitHub for backup and collaboration.
Prerequisites
Before you start, make sure you have:
- A Unity project that builds locally.
- Git installed (CLI tools or a Git client).
- A GitHub account if you want remote backups or collaboration.
Table of Contents
- Quick Summary
- Prerequisites
- Why You Need Version Control for Unity
- What is Git?
- What is a .gitignore?
- How to Initialize a Git Repository for Your Unity Project
- Using Git LFS with Unity To Track Large Assets
- Making Your First Commit
- Useful Git Commands for Unity Developers
- Commit Early, Commit Often
- Branching and Merging
- Asset Conflicts and Merging
- Git Clients: UI for Git!
- Git on the Web: GitHub for Unity Developers
- Pushing your Unity Project to GitHub
- Working with a Team: GitHub Organizations
- Creating Your First Pull Request on GitHub
- Sharing Code and Assets Between Projects: Submodules vs Unity Packages
- Git on a Team: Branching Strategies for Unity
- Automated Unity Builds and CI/CD with GitHub Actions
Why You Need Version Control for Unity
Timmy the Clever Game Developer
Meet Timmy, a talented and passionate game developer. Like many before him, Timmy started his career by working on small projects, handling everything from code to art. Timmy had a clever way of tracking changes to his project. Whenever he made significant changes, he would create a new version of the file, appending a systematic version number to end of the filename. It worked great – GameScene_v0.0.1.unity, GameScene_v0.0.2.unity, and so on.
But as his projects grew in complexity, so did his file naming conventions. Soon, his project folder was littered with files GameScene_v3.6.7_FINAL.unity, GameScene_v3.6.7_FINAL_b.unity, and GameScene_v3.6.7_REALLYFINAL.unity. Finding the right file became a game in itself. Timmy’s team was not too happy either, unable to understand which version of Timmy’s files they should use.
There must be a better way, Timmy thought.
Timmy Discovers Source Control
One day, Timmy decided enough was enough. He read an interesting blog post which introduced him to the world of version control systems (VCS). Intrigued, Timmy started learning about Git, a popular and powerful VCS.
The more Timmy learned about Git, the more he realized how it could revolutionize his workflow. Instead of manually renaming files and risking data loss, Git could track every change automatically. He could create branches for new features, merge them seamlessly, and revert to previous versions effortlessly. Collaboration would become straightforward, with each team member working on their own branch without conflict.
What is Git?
Git is a distributed version control system (VCS) that allows developers to track changes in their code, collaborate with others, and manage their projects efficiently.
Git was initially created by Linus Torvalds, the creator of the Linux operating system, in 2005. He developed Git to manage the Linux kernel development, and it has since become one of the most widely used version control systems in the world.
Git has been used for solo Unity projects and for AAA games. At Virtual Maker, we use Git for all of our projects.
Basic Concepts
Learning all the concepts in Git can take a bit of time. We’ll start with the core concepts that are most important to understanding what you’re doing.
Repository / Repo
All of your project files and the entire history of their changes are kept in a repo. A repo can be stored locally on your computer or remotely on a service like GitHub or GitLab.
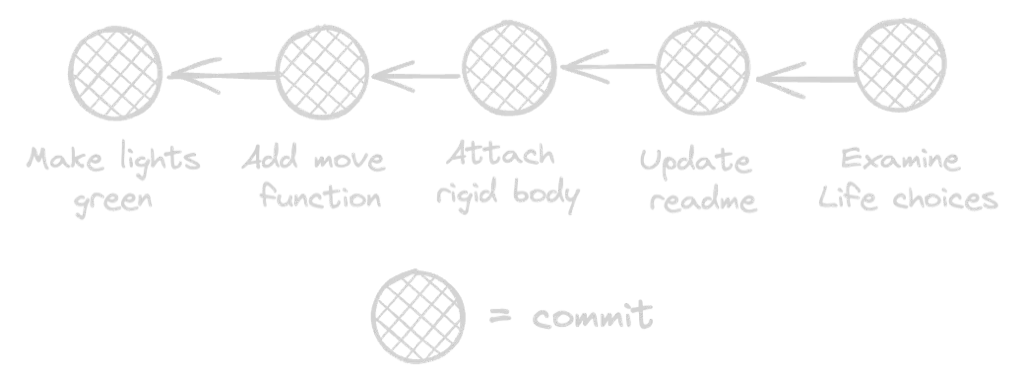
Commit
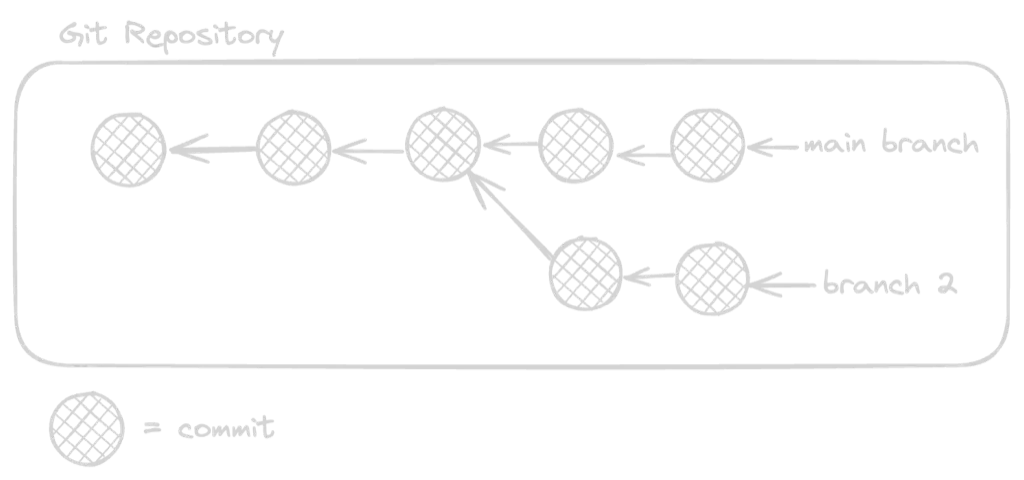
Commits are the units of your Git history. Each time you make changes, you bundle them into a commit. Git stores commits in a directed graph where each commit points to the previous commit.
Branch
A branch is just a named location in your Git history. You can create branches to work on different bugs and features independently, then “merge” those branches back together when you’re done. The default branch is often called main.
How to Initialize a Git Repository for Your Unity Project
To get started, you need to install Git from one of these links:
In this guide, we’ll illustrate how to use Git with the command line. This is the best way to understand how Git works. Once you’ve mastered the basics, you can use Git Clients like Fork and GitHub Desktop that offer a graphical interface (if you prefer).
Let’s get started.
Choose a Unity project or create a new one. Then, open your terminal or command prompt and navigate to your Unity project directory.
> cd path/to/my/unity/projectInitialize the repository by using the git init command:
> git init
Initialized empty Git repository in /Users/vm/repos/GitTestProject/.git/
This command creates a new subdirectory named .git that contains all of your necessary repository files.
Now, use git status to see what Git sees.
> git status
On branch main

No commits yet

Untracked files:
  (use "git add <file>..." to include in what will be committed)
        Assets/
        GitTestProject.sln
        Library/
        Logs/
        Packages/
        ProjectSettings/
        Unity.Services.Core.Analytics.csproj
        Unity.Services.Core.Configuration.Editor.csproj
        Unity.Services.Core.Configuration.csproj
        Unity.Services.Core.Device.csproj
        Unity.Services.Core.Editor.csproj
        Unity.Services.Core.Environments.Internal.csproj
        Unity.Services.Core.Environments.csproj
        Unity.Services.Core.Internal.csproj
        Unity.Services.Core.Networking.csproj
        Unity.Services.Core.Registration.csproj
        Unity.Services.Core.Scheduler.csproj
        Unity.Services.Core.Telemetry.csproj
        Unity.Services.Core.Threading.csproj
        Unity.Services.Core.csproj
        UnityEditor.UI.csproj
        UnityEngine.UI.csproj
        UserSettings/

nothing added to commit but untracked files present (use "git add" to track)
Git says there are no commits, so nothing is being tracked in version control. Git lists files that could be tracked but aren’t as untracked files.
Before we start tracking files, we need to ensure Git doesn’t track anything we don’t need.
What is a .gitignore?
A .gitignore file specifies which files and directories git should ignore in a project. For Unity projects, this file is crucial because it helps avoid committing all the stuff that Unity will regenerate by itself, like the Library, Temp, and Logs folders.
This is a template .gitignore for Unity projects. Drop it in the root folder of your repository.
Now let’s check what git status says:
> git status
On branch main

No commits yet

Untracked files:
  (use "git add <file>..." to include in what will be committed)
        .gitignore
        .vscode/
        Assets/
        Packages/
        ProjectSettings/

nothing added to commit but untracked files present (use "git add" to track)
Notice that Unity generates .meta files for every asset. Always commit your .meta files along with the assets themselves. If you lose them, Unity will regenerate new GUIDs and break references across scenes, prefabs, and materials.
Using Git LFS with Unity To Track Large Assets
If your project doesn’t have any large files, then skip this section and come back to it later. As a rule of thumb, we consider 10 MB a “large” file, but this is up to you.
The problem with large files stems from how Git was designed. Each commit in repo contains all of the changes made since the previous commit. So, if you commit a 10 MB image, you add 10 MB to the size of your repository — forever. Even if you delete the file in the next commit, the file is still tracked in the history.
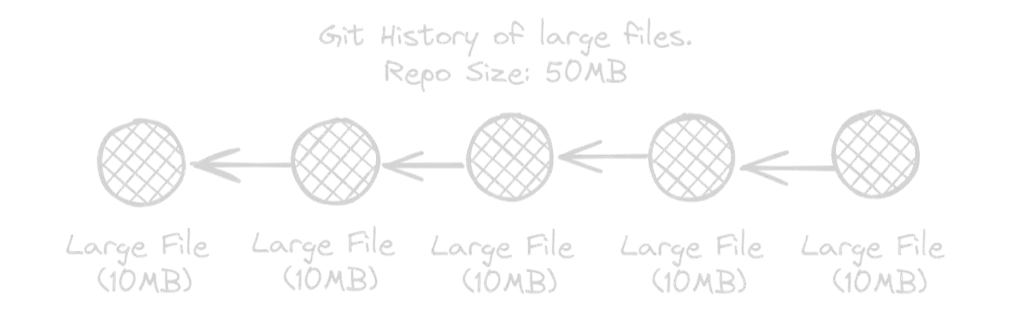
To make matters worse, each time you edit and commit a large binary file like an image or audio file, the entire file is added to your Git history. This will cause the repo size to balloon, taking much more disk space on each developer’s machine than they would need without Git.
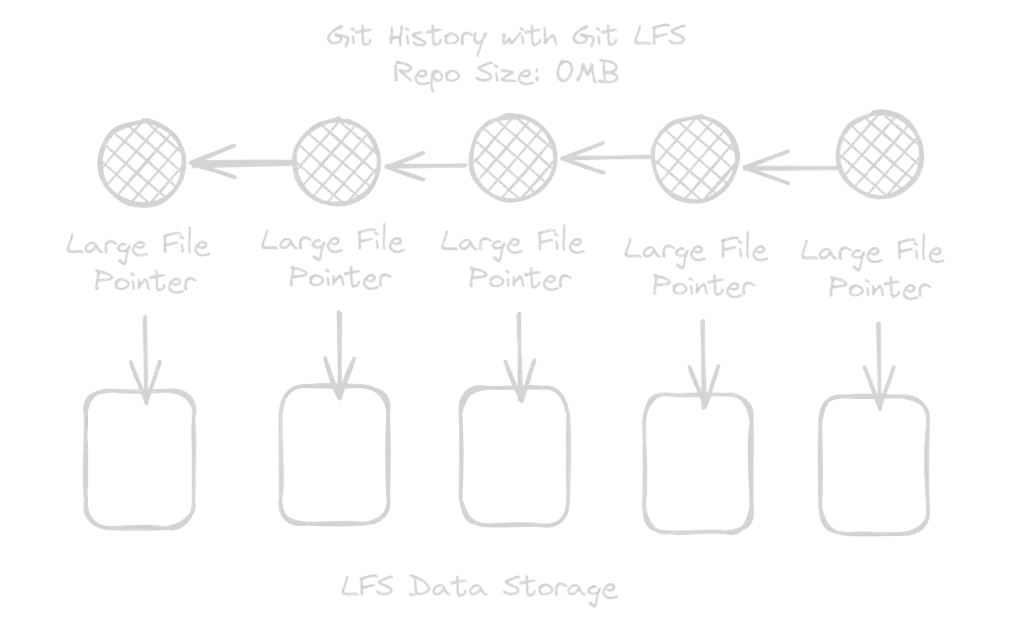
Git LFS (Large File Storage) solves this problem by only storing a pointer to the large file into the Git history. The large file itself is stored in a separate database so it doesn’t take space in your repository, and only the necessary version is downloaded onto each developer’s machine.
Note: Git web hosts like GitHub will limit how much LFS data you can have and will charge you to increase this limit.
To use Git LFS, each member of your team needs to install it.
Once installed, Git LFS needs to be set up for each user account using git lfs install.
> git lfs install
Updated Git hooks.
Git LFS initialized.
There are two ways to tell LFS which files to track:
- Track specific files.
- Pattern match with the wildcard
*syntax.
Important: You need to set up LFS tracking rules before adding the large files to git. Otherwise, they won’t be tracked by LFS correctly.
Tracking specific files with LFS
If you’re using a web host like GitHub, it’s usually best to track specific large files to avoid unnecessary LFS limits and fees. Track a specific file with LFS using the command:
> git lfs track path/to/MyLargeFileThis command will create or modify the .gitattributes file. You can inspect and edit this file manually.
path/to/MyLargeFile filter=lfs diff=lfs merge=lfs -textThe -text at the end tells Git to treat the file as binary and skip line-ending normalization. The file checked in to Git will be a simple text pointer to the real file tracked by LFS.
The “filter”, “diff”, and “merge” options are how LFS hooks into Git’s operations to download the real file onto your machine.
Pattern matching files with LFS
Usually, large files are of a certain type. For example, maybe you have many videos of .mov format. Track these files with LFS using the command:
> git lfs track "*.mov"Here are some other file types you may want to track. However, keep in mind that web hosts like GitHub will charge you based on how much LFS data you use.
# Image
*.jpg filter=lfs diff=lfs merge=lfs -text
*.jpeg filter=lfs diff=lfs merge=lfs -text
*.png filter=lfs diff=lfs merge=lfs -text
*.gif filter=lfs diff=lfs merge=lfs -text
*.psd filter=lfs diff=lfs merge=lfs -text
*.ai filter=lfs diff=lfs merge=lfs -text
*.tif filter=lfs diff=lfs merge=lfs -text

# Audio
*.mp3 filter=lfs diff=lfs merge=lfs -text
*.wav filter=lfs diff=lfs merge=lfs -text
*.ogg filter=lfs diff=lfs merge=lfs -text

# Video
*.mp4 filter=lfs diff=lfs merge=lfs -text
*.mov filter=lfs diff=lfs merge=lfs -text

# 3D Object
*.FBX filter=lfs diff=lfs merge=lfs -text
*.fbx filter=lfs diff=lfs merge=lfs -text
*.blend filter=lfs diff=lfs merge=lfs -text
*.obj filter=lfs diff=lfs merge=lfs -text

# ETC
*.a filter=lfs diff=lfs merge=lfs -text
*.exr filter=lfs diff=lfs merge=lfs -text
*.tga filter=lfs diff=lfs merge=lfs -text
*.pdf filter=lfs diff=lfs merge=lfs -text
*.zip filter=lfs diff=lfs merge=lfs -text
*.dll filter=lfs diff=lfs merge=lfs -text
*.unitypackage filter=lfs diff=lfs merge=lfs -text
*.aif filter=lfs diff=lfs merge=lfs -text
*.ttf filter=lfs diff=lfs merge=lfs -text
*.rns filter=lfs diff=lfs merge=lfs -text
*.reason filter=lfs diff=lfs merge=lfs -text
*.lxo filter=lfs diff=lfs merge=lfs -text
Now that the large files are taken care of, let’s get back to making your first commit!
Making your First Commit
To make a commit takes two steps. First, we “stage” the changes using the git add command. This command can be used over and over to select which files you want to add to the commit.
The git add . command is a shorthand to stage everything in the current directory.
> git add .Let’s do a quick check to see that Git is tracking with the git status command. Your list of files may be different depending on your project setup.
> git status
On branch main

No commits yet

Changes to be committed:
  (use "git rm --cached <file>..." to unstage)
        new file:   .gitignore
        new file:   Assets/Scenes.meta
        new file:   Assets/Scenes/SampleScene.unity
        new file:   Assets/Scenes/SampleScene.unity.meta
        new file:   Packages/manifest.json
        new file:   Packages/packages-lock.json
        new file:   ProjectSettings/AudioManager.asset
        new file:   ProjectSettings/ClusterInputManager.asset
        new file:   ProjectSettings/DynamicsManager.asset
        new file:   ProjectSettings/EditorBuildSettings.asset
        new file:   ProjectSettings/EditorSettings.asset
        new file:   ProjectSettings/GraphicsSettings.asset
        new file:   ProjectSettings/InputManager.asset
        new file:   ProjectSettings/MemorySettings.asset
        new file:   ProjectSettings/NavMeshAreas.asset
        new file:   ProjectSettings/PackageManagerSettings.asset
        new file:   ProjectSettings/Packages/com.unity.testtools.codecoverage/Settings.json
        new file:   ProjectSettings/Physics2DSettings.asset
        new file:   ProjectSettings/PresetManager.asset
        new file:   ProjectSettings/ProjectSettings.asset
        new file:   ProjectSettings/ProjectVersion.txt
        new file:   ProjectSettings/QualitySettings.asset
        new file:   ProjectSettings/TagManager.asset
        new file:   ProjectSettings/TimeManager.asset
        new file:   ProjectSettings/UnityConnectSettings.asset
        new file:   ProjectSettings/VFXManager.asset
        new file:   ProjectSettings/VersionControlSettings.asset
        new file:   ProjectSettings/XRSettings.asset
        new file:   ProjectSettings/boot.config
Now we can use the git commit command to create a new commit with a meaningful message:
> git commit -m "Initial commit of my Unity project"

[main (root-commit) e1c03d9] Initial commit of my Unity project
 29 files changed, 2717 insertions(+)
 create mode 100644 .gitignore
 create mode 100644 Assets/Scenes.meta
 create mode 100644 Assets/Scenes/SampleScene.unity
 create mode 100644 Assets/Scenes/SampleScene.unity.meta
 create mode 100644 Packages/manifest.json
 create mode 100644 Packages/packages-lock.json
 create mode 100644 ProjectSettings/AudioManager.asset
 create mode 100644 ProjectSettings/ClusterInputManager.asset
 create mode 100644 ProjectSettings/DynamicsManager.asset
 create mode 100644 ProjectSettings/EditorBuildSettings.asset
 create mode 100644 ProjectSettings/EditorSettings.asset
 create mode 100644 ProjectSettings/GraphicsSettings.asset
 create mode 100644 ProjectSettings/InputManager.asset
 create mode 100644 ProjectSettings/MemorySettings.asset
 create mode 100644 ProjectSettings/NavMeshAreas.asset
 create mode 100644 ProjectSettings/PackageManagerSettings.asset
 create mode 100644 ProjectSettings/Packages/com.unity.testtools.codecoverage/Settings.json
 create mode 100644 ProjectSettings/Physics2DSettings.asset
 create mode 100644 ProjectSettings/PresetManager.asset
 create mode 100644 ProjectSettings/ProjectSettings.asset
 create mode 100644 ProjectSettings/ProjectVersion.txt
 create mode 100644 ProjectSettings/QualitySettings.asset
 create mode 100644 ProjectSettings/TagManager.asset
 create mode 100644 ProjectSettings/TimeManager.asset
 create mode 100644 ProjectSettings/UnityConnectSettings.asset
 create mode 100644 ProjectSettings/VFXManager.asset
 create mode 100644 ProjectSettings/VersionControlSettings.asset
 create mode 100644 ProjectSettings/XRSettings.asset
 create mode 100644 ProjectSettings/boot.config
Pay attention to the first line that Git printed out:
[main (root-commit) e1c03d9] Initial commit of my Unity projectmain is the name of the branch that Git added the commit onto. e1c03d9 are the last 7 characters of the ID of this commit. If we use the git log command, we can see the full ID and your message.
> git log
commit e1c03d962e7f8e4d1e08f69b6aebbc3e528b5b84 (HEAD -> main)
Author: Alon Farchy <some@email.net>
Date:   Tue Jul 16 15:34:39 2024 -0700

    Initial commit of my Unity project
Useful Git Commands for Unity Developers
Here are some useful Git commands that you might need frequently:
git status: Check the status of your working directory.git add: Stage a file to be added to the commit.git reset: Unstage a file so it won’t be added to the commit.git commit: Create a commit.git revert: Create a new commit that undoes everything in a previous commit.git log: View the commit history.git reflog: View the history of what you did (commit, checkout, reset, etc.)git branch: List, create, or delete branches.git switch: Switch branches.git restore: Restore a file from the latest commit or another revision.git checkout: Older command to switch branches or update a file to specific versiongit merge: Merge branches.git fetch: Download changes from your remote repository.git pull: Dogit fetchand then merge your branch with any remote changes.git push: Upload changes made to your branch to your remote repository.
For a comprehensive list of commands and their usage, refer to the Git documentation, or consider learning with an interactive tutorial like learngitbranching.
Commit Early, Commit Often
In Git, commits are considered “cheap” because they only store file changes. Because of this, you can use Git as your personal undo system by committing frequently. Each time you make some small changes, you can make a commit and return to it later if you don’t like the changes you made.
In Unity, committing often is even more relevant because it’s easy to accidentally lose your undo history. For example, when you make some changes to a prefab in Unity, and then close that prefab, you’ll lose the undo history for that prefab. Or, what if you’re trying out some changes to a scene and Unity crashes? Goodbye undo history.
Your typical workflow should look something like this:
- Do some work.
- Hit the Save button in Unity!
- Make a commit.
> git add <files>
> git commit -m "Description of what has changed"- Backup your commit by pushing it to your remote repo. We’ll discuss remote repos in the section: Git on the Web: GitHub for Unity Developers.
> git push- Repeat.
Help, I made a boo boo!
If you make a mistake, you can use the commands in this cheatsheet to roll back to an earlier version.
# Unstage a file so it won't be committed
> git reset <path>

# Restore the version of the file at the latest commit.
> git restore <path>

# Restore the version of the file at the commit before the latest.
> git restore --source=HEAD~1 <path>

# Restore the version of a file at a particular commit
> git restore --source=<commit-id> <path>

# Create a NEW commit that undoes everything in the specified commit
> git revert <commit-id>

# Delete files which are not tracked by Git. Useful when Unity gets in a bad state.
> git clean -xfd <path>

# Move your branch to the target commit without changing your files.
> git reset <commit-id>

# Move your branch to the target commit and discard all your changes.
> git reset --hard <commit-id>

# Shows you the history of what you did (commit, checkout, reset, etc.)
> git reflog
Branching and Merging
Often, you and your team will be working on multiple things at once. This is where branching comes handy. In Git, you are always making commits into a branch. By default, this is the main branch.
From the main branch, you can create a new branch using the git switch -c command.
> git switch -c branch1
Switched to a new branch 'branch1'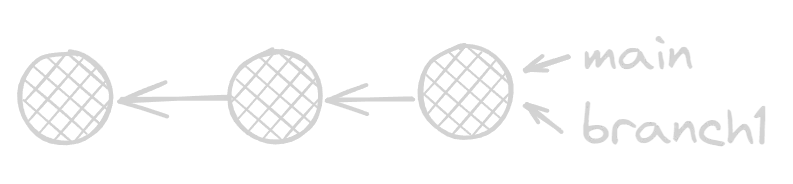
Think of your repository like a tree. The trunk of the tree is the main branch, and you’ve just created the first branch on that tree called branch1.
Many Git commands operate on the current branch, also called HEAD. As you make new commits, you’ll add them to branch1 instead of main.
Let’s create a new file and commit it to branch1.

> echo 1234 > file.txt
> git add file.txt
> git commit -m "Creating my first commit on branch1"
Let’s compare the histories of main and branch1 using the git log command.
> git log main
commit e1c03d962e7f8e4d1e08f69b6aebbc3e528b5b84 (main)
Author: Alon Farchy <some@email.com>
Date:   Tue Jul 16 15:34:39 2024 -0700

    Initial commit of my Unity project
> git log branch1
commit 736c35ada5a09ef54737f12ded8bb83d92cdc9d3 (HEAD -> branch1)
Author: Alon Farchy <some@email.com>
Date: Sun Jul 21 19:24:54 2024 -0700
Creating my first commit on branch1
commit e1c03d962e7f8e4d1e08f69b6aebbc3e528b5b84 (main)
Author: Alon Farchy <some@email.com>
Date: Tue Jul 16 15:34:39 2024 -0700
Initial commit of my Unity projectYou can see that the history of branch1 also contains the history of main, but the main branch hasn’t been changed.
We can always go back to the main branch and make a commit there.

> git switch main
Switched to branch 'main'

> echo 4567 > file.txt
> git add file.txt
> git commit -m "Added file.txt to main"
Now let’s look at the history of each branch
> git log main
commit 855678981c8179c05baaf17c29090726976f6860 (HEAD -> main)
Author: Alon Farchy <some@email.com>
Date:   Sun Jul 21 19:29:17 2024 -0700

    Added file.txt to main

commit e1c03d962e7f8e4d1e08f69b6aebbc3e528b5b84
Author: Alon Farchy <some@email.com>
Date:   Tue Jul 16 15:34:39 2024 -0700

    Initial commit of my Unity project
> git log branch1
commit 736c35ada5a09ef54737f12ded8bb83d92cdc9d3 (branch1)
Author: Alon Farchy <some@email.com>
Date: Sun Jul 21 19:24:54 2024 -0700
Creating my first commit on branch1
commit e1c03d962e7f8e4d1e08f69b6aebbc3e528b5b84
Author: Alon Farchy <some@email.com>
Date: Tue Jul 16 15:34:39 2024 -0700
Initial commit of my Unity projectThese branches have now diverged, which means that each branch has at least one commit that the other does not.
Merging Branches
To bring these branches back together, we can merge them with the git merge command. This will take the commits in a specified branch and try to combine them with the commits in the current branch.

Let’s try merging branch1 into main.
> git switch main
Switched to branch 'main'.

> git merge branch1
Auto-merging file.txt
CONFLICT (add/add): Merge conflict in file.txt
Automatic merge failed; fix conflicts and then commit the result.
Uh oh. If you’ve been following these examples, you’ll notice that we added file.txt in both branches and gave them different contents. Git doesn’t know what you want to do, so it sounds the alarm by calling a merge conflict.
Merge Conflicts
Merge conflicts happen when Git can’t automatically reconcile the differences between two commits. This usually occurs when the same line in a file has been changed in both branches. In our case, file.txt was modified in both main and branch1, resulting in a conflict.
When a merge conflict occurs, Git leaves both changes in the file, like so:
<<<<<<< HEAD
4567
=======
1234
>>>>>>> branch1
This notation shows the conflicting sections. Remember that HEAD refers to our current place in history, which is the main branch.
- The content between
<<<<<<< HEADand=======is from themainbranch. - The content between
=======and>>>>>>> branch1is frombranch1.
To resolve the conflict, you need to edit the file to contain the correct final content. You might decide to keep one change over the other, or merge the two changes together.
Once you’re done merging the file, use git add to stage it for the merge commit. When all files are staged, we can use git merge --continue to complete the merge.
> git add file.txt
> git merge --continue
Asset Conflicts and Merging
Merging your code and text files is straightforward, but what about assets? Two people on your team might edit the same image files, audio files, Unity scenes, prefabs, or many other files in your project. This can cause a big problem because these assets are not easy to merge. In the worst case, one teammate will have to redo their work.
Let’s address this problem with two strategies:
- How to avoid asset conflicts.
- How to use Unity’s YAML merge tool to merge scenes and prefabs.
Before you go further, make sure your Unity project is set to Visible Meta Files and Force Text (Project Settings > Editor). This makes scenes and prefabs readable in Git diffs and greatly improves merge success.
How to Avoid Asset Conflicts
If there’s no conflict, there’s nothing to merge. Problem solved! But how can you actually avoid conflicts?
Let’s take an example scenario. One developer is adjusting the jump parameters of a character by editing fields on the components attached to the character. Another developer is updating the colors and fonts of the main menu. If the UI and the character are both in the same scene, then there will be a conflict on the scene asset.
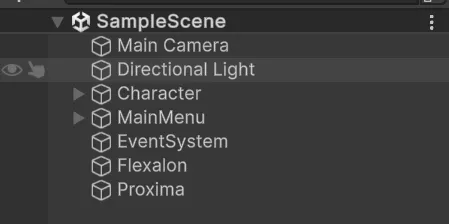
Break up your Scenes
We can avoid this conflict if the character and the main menu were each separate prefabs. Each developer could update the prefab instead of updating the scene.
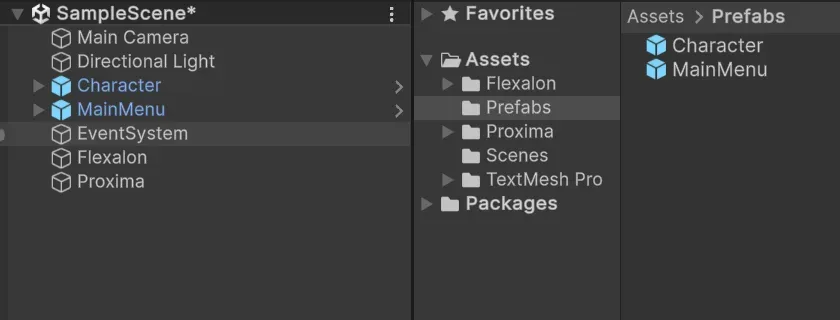
Taking this strategy to its logical conclusion, you can avoid many asset conflicts by moving every GameObject in the scene into its own prefab.
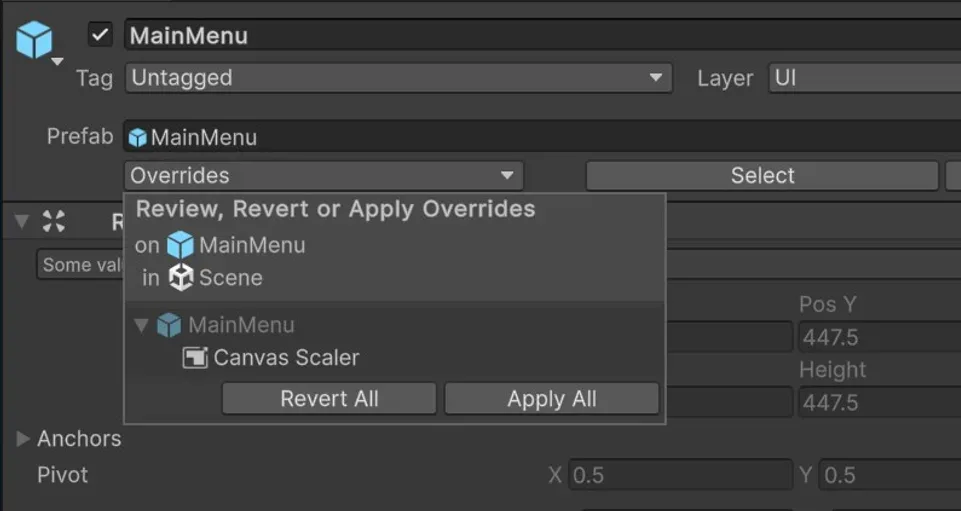
Hint: Sometimes you’ll accidentally edit a prefab in the scene. Oops! Fortunately, Unity has a solution for this. Find the Overrides dropdown on the root GameObject of your prefab. Not only can you see which fields have been edited, but you can also apply those edits to the prefab. Nifty!
Sometimes, you’ll end up with a very large prefab. For example, maybe the whole UI for the game is in one big prefab. Now you might get asset conflicts on this large prefab.
We can fix this with the same strategy: break up the large prefab into smaller prefabs. It’s up to you to balance the complexity of more prefabs and the risk of asset conflicts.
If done correctly, the only time the scene or large prefab needs to be edited is:
- To add or remove a prefab, or
- To drag a reference from one prefab into the component property of another prefab.
It’s possible to avoid the first case by instantiating all of your prefabs at runtime. You will have to decide for yourself if this tradeoff is worth the effort.
But how do we deal with the second case: references across prefabs?
Avoiding Asset References: Dependency Injection and Service Locator
In any beginner’s guide to Unity, you learn how to create public properties on your components which appear as editable fields in the editor. If these properties are a component type or GameObject type, then you can drag other GameObjects from the scene into these fields and Unity will inject them into your component. Magic.
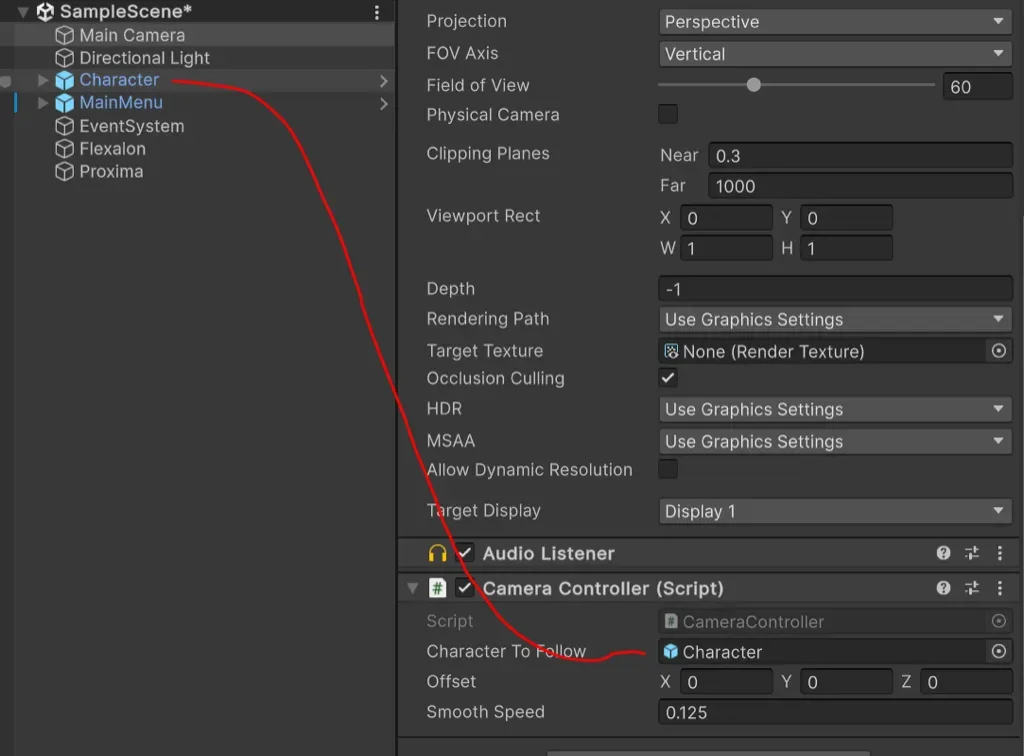
While convenient, these references can cause frustrating asset conflicts in two ways. First, they simply create more reasons for you to edit your assets. Second, if these references are between separate prefabs, then you end up having to edit the scene to set these references. This reduces the benefits of breaking the scene up into prefabs.
This problem isn’t just an asset problem. It’s actually a well known problem in software architecture: how do you get separate parts of your code to access each other? Martin Fowler, a well known software engineer, wrote a great article on this topic. Cutting to the chase, you have two options:
- Dependency Injection: The entity instantiating your component hands you the references you need.
- Service Locator: You look up the references you need in a well known table (the service locator).
When you drag objects into fields in the scene, Unity is effectively performing dependency injection for you by ‘injecting’ references to your component at runtime. Unfortunately, this forces you to edit the scene, which creates merge conflicts.
Instead, you can use a dependency injection library or a service locator library help you solve this problem. At Virtual Maker, we use a custom service locator library, but here are some open source options you can choose from.
- VContainer: A dependency injection library that is “light and fast”.
- Extenject: A dependency injection library forked from Zenject with lots of features.
How to use Unity’s YAML merge tool to merge scenes and prefabs.
Ok, so you broke up your scene into prefabs, but now two developers have added new prefabs to the scene. What do you do?
Meet your new best friend: UnityYAMLMerge. This is a “mergetool” which will attempt to automatically merge scenes and prefabs. In simple cases, like two developers adding or removing different prefabs to the scene, it can resolve the conflict correctly by adding or removing the correct prefabs.
Unfortunately, this is not a get out of jail free card. You might still hit unresolvable conflicts, like two developers changing the same transform’s position. In this case, you’ll have to manually merge the files.
Unity stores its scenes, prefabs, and many other asset files in a YAML text format. For simple conflicts like a transform position change, you can edit the YAML files directly to merge the changes.
It’s also possible for UnityYAMLMerge to do the wrong thing in complicated situations. Suppose one developer unpacks a prefab in the scene, and another developer overrides a value in the same prefab. UnityYAMLMerge will end up keeping both versions of the prefab in the scene.
Git Clients: UI for Git!

While the command line is a powerful tool for working with Git, many developers prefer to use Git clients for their graphical interfaces and additional features. Git clients can make managing repositories more intuitive, especially for those who are new to version control or prefer a visual approach.
Important: Even if you use one of these Git clients, it is important to install the Git command line tools. Not only are these tools useful in a pinch, but they are required for Unity to install git dependency packages!
Below are some of the most popular Git clients available:
GitHub Desktop
GitHub Desktop is a free, open-source Git client developed by GitHub. It is designed to simplify the Git workflow, making it accessible for both beginners and experienced developers.
SourceTree
SourceTree is a free Git client developed by Atlassian. It supports both Git and Mercurial repositories and offers a rich set of features for managing your version control workflows.
GitKraken
GitKraken is a cross-platform Git client known for its elegant interface and robust features. It is designed to streamline Git workflows and improve productivity.
Tower
Tower is a powerful Git client available for macOS and Windows. It offers a comprehensive set of features designed for professional developers and teams.
Fork
Fork is a fast and friendly Git client for macOS and Windows. It focuses on providing a simple yet powerful interface for managing Git repositories.
Git on the Web: GitHub for Unity Developers
So now we know how to use Git for version control. Now we’ll learn how to backup your project and start collaborating with a team.
GitHub is a web-based platform that hosts Git repositories. It provides tools for collaborative development, code review, and project management. By pushing your local Git repository to GitHub, you can collaborate with others, track issues, and more.
We use GitHub here as an example, but there are also other hosts you could explore like GitLab and BitBucket.
Pushing your Unity Project to GitHub
To push your local repository to GitHub, follow these steps:
Create a free account on GitHub.
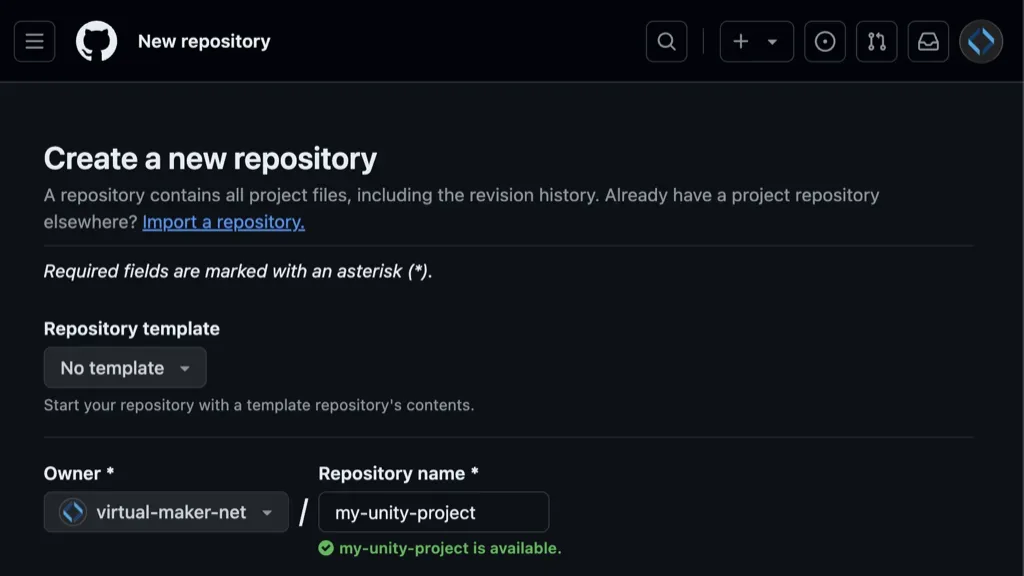
Set these options:
- No template
- Choose yourself as the owner and give your repo a name.
- Choose
Privateunless you want your project to be available to anyone on the internet. - Leave
Add a README fileunchecked, since we’ll be pushing our own content. - Don’t add a
.gitignore, since you already have one. - Leave License as
Noneif you chosePrivate, or choose an appropriate license. - Click
Create repository.
- Push your changes using these commands, replacing
{org}and{repo}:
> git remote add origin https://github.com/{org}/{repo}.git
> git push -u origin main
Congratulations, your project is now backed up to GitHub! You can test this by “cloning” your repository to another device or folder using the git clone command:
> git clone https://github.com/{org}/{repo}.gitEach time you make a commit, you can git push your branch to GitHub and then git pull those changes from GitHub to one of your other clones.
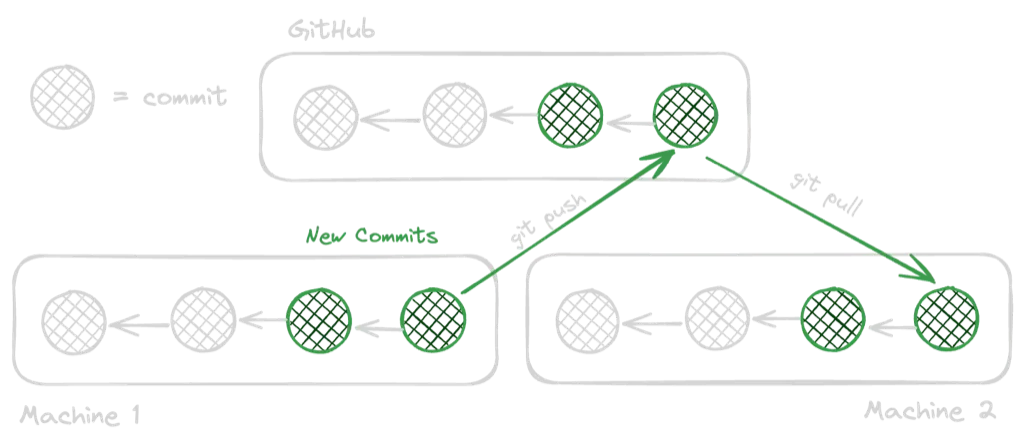
# Machine 1
> git push

# Machine 2
> git pull
Working with a Team: GitHub Organizations
A GitHub organization is a shared account for collaborative projects. It allows teams to manage permissions, streamline access, and consolidate billing. Key features include:
- Team Management: Group members into teams with different access levels.
- Repository Permissions: Control who can push, review, and administer repositories.
- Project Management: Use tools like GitHub Projects for task tracking and progress management.
As of May 2026, creating an organization on GitHub is free with limited features.
To create an organization, click your profile picture > Your organizations > New organization.
Once you’ve created an organization, you can either create a new repo or transfer an existing repo to the organization in the Settings page for that repo.
Creating Your First Pull Request
When working on a team, it’s often important for team members to review each other’s changes before merging them into the main branch or release branches. In Git nomenclature, this review process is called a “pull request” because you’re making a request to your team to pull your changes into another branch.
There are several critical advantages to using pull requests:
- Team members can catch each other’s mistakes.
- Team members can suggest alternative ways to fix a bug or implement a feature.
- Automation can run with each pull request to build the Unity project for playtesting or perform other checks.
- By their nature, pull requests create a clear history of changes going into the main branch, allowing individual bug fixes or features to be reverted if necessary.
Creating a new branch for your pull request
Let’s start simple by making a trivial pull request. First, we need to make a new branch to do our feature development.
# Go to the main branch and get the latest changes.
> git switch main
> git pull

# Create a new branch off main
> git switch -c dev/test-feature
This command creates a new branch from main called dev/test-feature. The dev/ part is a naming convention we like to use to separate developer branches from the main branch.
As a test, let’s add a new text file to your repository and make a new commit:
> git add path/to/my_file.txt
> git commit -m "Adding my_file"
Finally, push this branch and all of its commits to GitHub:
> git push -u origin dev/test-featureAfter the first time you push a branch, you can just use the shorthand git push.
Creating a new pull request
Now let’s go to GitHub and create a pull request:
- Go to your repo:
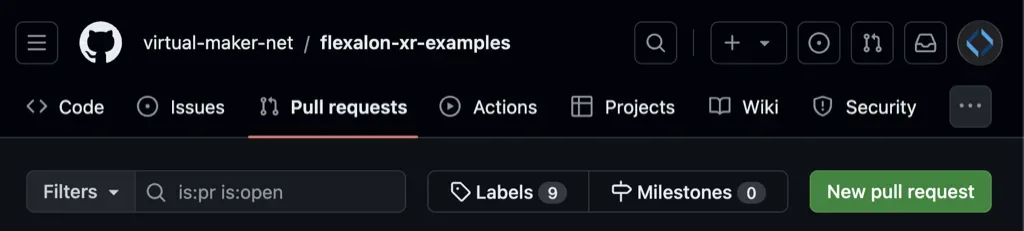
https://github.com/{org}/{repo} - Click
Pull requests - Click
New pull request - Set the
basetomainandcomparetodev/test-feature. - Add a title and description
- Click
Create pull request
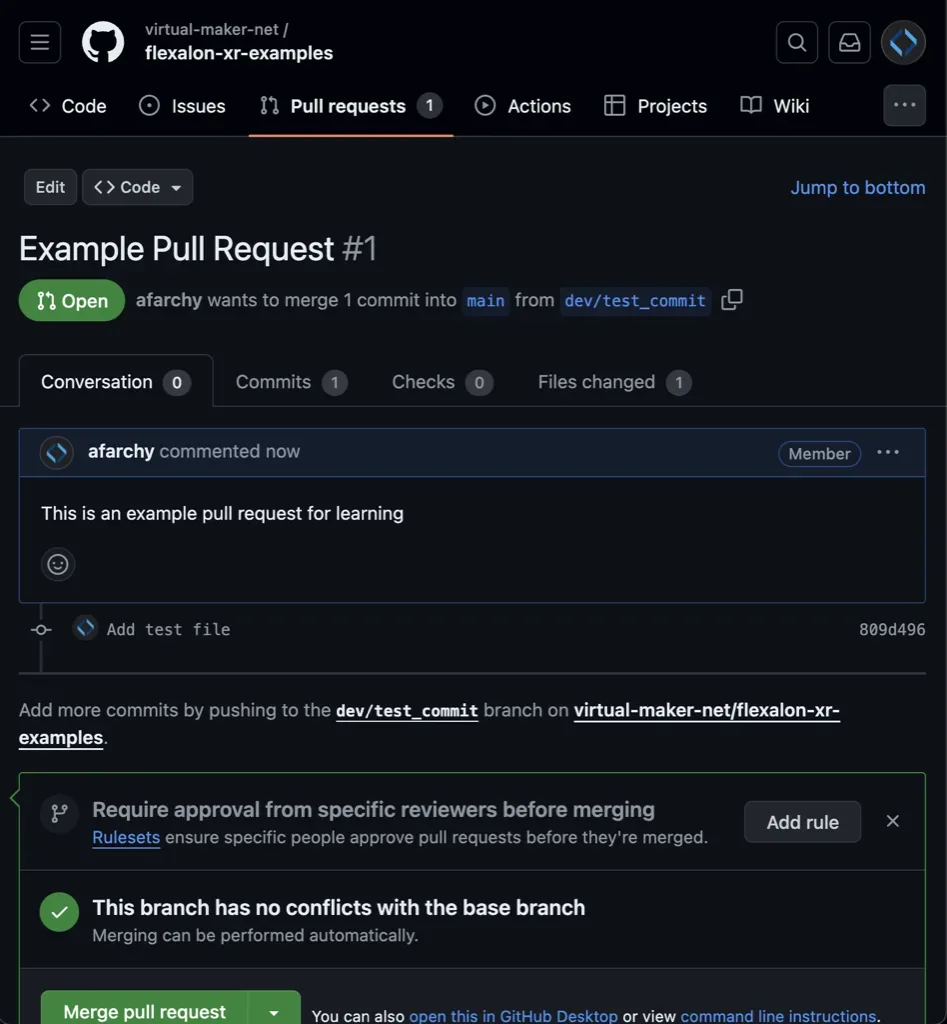
This will take you to your pull request page.
Review the pull request
From the pull request page, there are many options. Most importantly, your team can click the Files changed tab to start reviewing the pull request.
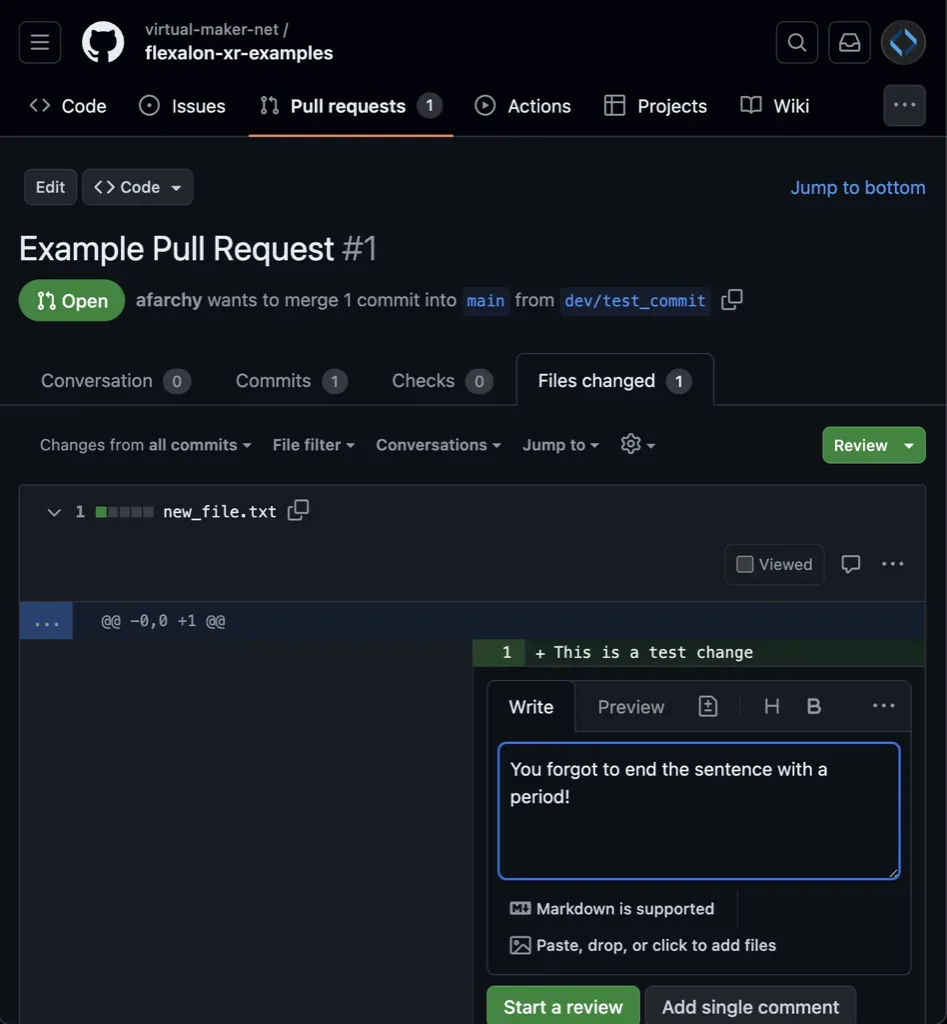
Once you start a review, you can add comments to individual files. Important: your team won’t see your comments until you finish your review.
Once you’re done making comments, click the Review dropdown and finish your review.
Update your Pull Request
At any point during the review process, you can create a new commit, and use git push to update your branch on GitHub. The pull request will be automatically updated with your changes.
Complete the pull request
Once you’ve answered all your team’s comments and are ready to complete your pull requests, navigate back to the Conversation tab and locate the Merge pull request button. If you click the dropdown, you’ll see some options:
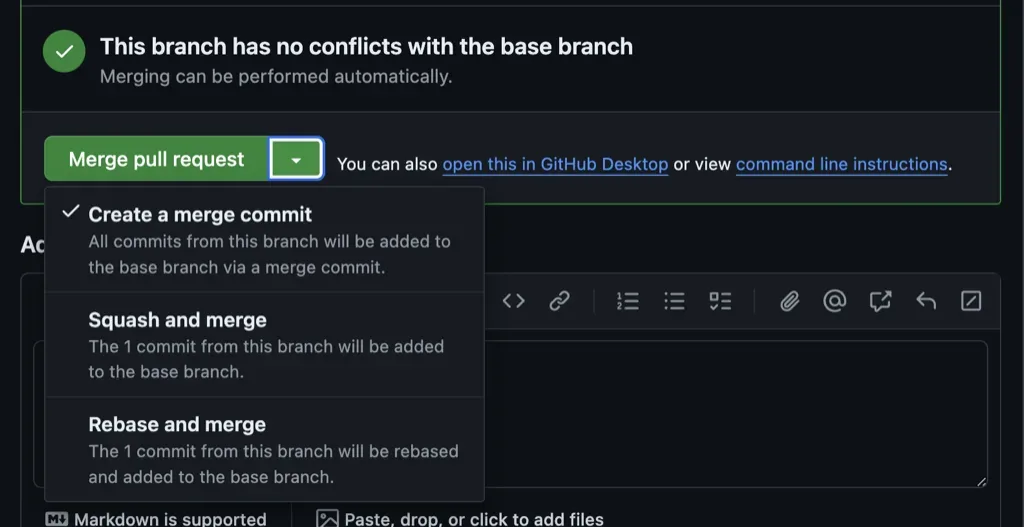
- Create a merge commit
- Squash and merge
- Rebase and merge
Creating a merge commit is the most straightforward option. It creates a new merge commit in your target branch (main) that combines your branch and the target branch together. All of the commits you made will appear in the main branch history.
Squash and merge is another popular option, where all your commits are “squashed” into one commit which is added to the main branch. This keeps the main history “clean” by not including all the little commits you made while developing your bug or feature, but in exchange you lose those details in your Git history.
Don’t use Rebase and merge unless you really know what you’re doing.
Summary of the Pull Request flow
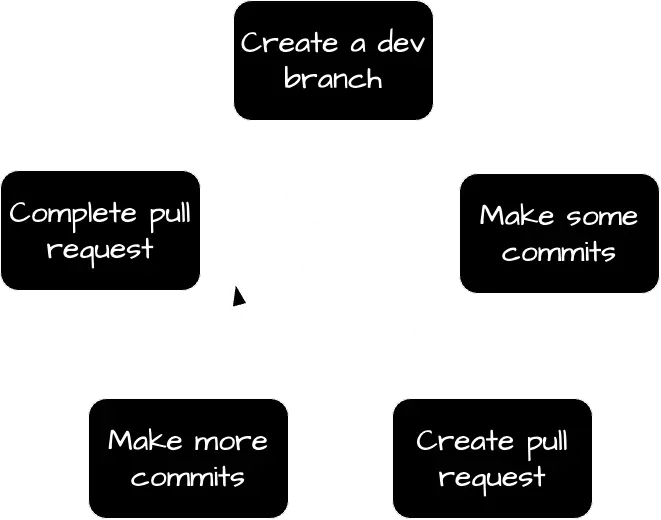
In a team that embraces pull requests, each member uses the following workflow:
- Create a new branch off
mainin which to do feature or bug work. - Commit often to this branch and push those changes to back them up.
- When ready, create a pull request back to the
mainbranch. - The team reviews the pull request. Automation also runs to build the project or run tests.
- Commit and push additional changes as needed.
- When all review comments are resolved, and all automation passes, complete the pull request.
Sharing Code and Assets Between Projects: Submodules vs Unity Packages
Once you’ve gotten the hang of storing your Unity projects in Git repositories, you may run into a situation where you have the same code and assets in multiple projects. You might then find yourself making changes in one project, and then having to repeat those changes in the second project. And the third project.
So, you may be thinking — is there a good way to share assets between repositories?
Here be Dragons!

Beware! Sharing assets between repos comes at a considerable cost:
- The project organization becomes more complicated, which makes it harder for your team to understand.
- Making changes to the shared assets becomes more difficult because multiple projects depend on them.
- The Git history is now split between the
mainrepository and the shared assets. It becomes an extra chore to keep them in sync.
To avoid these issues, some teams opt to use a monorepo, which is a big repository with multiple projects. To give you an extreme example, Microsoft opted to host all of Windows in a single repository. This required making changes to Git to cope with the millions of files.
Ok, you’ve been warned. If you’re still convinced your projects will benefit from sharing assets between repos, then you have two main options:
Git Submodules
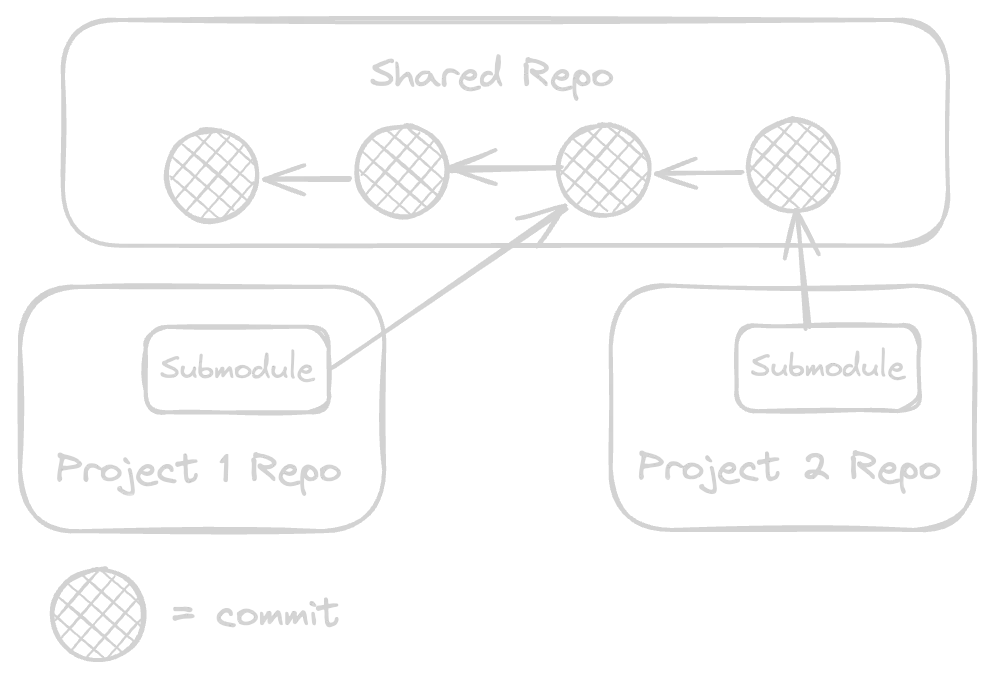
Git submodules are the Git-based solution to the sharing problem. A submodule is just a pointer from one repository to a commit in another repository. So, all you have to do is create a separate repository for your shared assets, then add a submodule to each of your projects. Sounds simple right?
Unfortunately, it’s not so simple in practice. Developers on the project need to be aware that submodules exist and to keep their local repo updated with the latest submodules. This makes the learning curve for Git steeper for new developers.
When should you use Submodules? If the code or assets you’re trying to share are in Unity, we recommend creating a Unity Package (see below) and using the Unity Package Manager (UPM) to pull it into different projects. Package dependencies are more automatic and can be properly versioned.
But if your shared assets are outside of Unity, then use submodules.
How to add a submodule to your repo
First, create a new repo with your shared assets. We’ll pull this repo into your main project repo as a submodule.
Navigate to the directory where you want to add your submodule and use the git submodule add command.
> cd main_repo/path/to/somewhere
> git submodule add https://github.com/{org}/{submodule_repo}

> git status
On branch main
Changes to be committed:
  (use "git restore --staged <file>..." to unstage)
        new file:   ../.gitmodules
        new file:   {submodule_repo}
You’ll notice git added or modified the .gitmodules file. You’ll also notice your repo appears like a “new file”. It’s a bit misleading - Git is actually just telling you that the submodule is staged to be committed.
Commit these changes:
> git commit -m "Add submodule"Now you need to know how to work with the submodule. If you cd into the submodule folder and start using git commands like git log, it will look just like you cloned this repository in a normal way. You can switch branches here, make changes, commit, push, etc.
However, any time you make changes, the parent repository will detect those changes. For example, if I add an untracked file to the submodule:
> git status
On branch main
Changes not staged for commit:
  (use "git add <file>..." to update what will be committed)
  (use "git restore <file>..." to discard changes in working directory)
  (commit or discard the untracked or modified content in submodules)
        modified:   {submodule_repo} (untracked content)
It doesn’t tell me which files have changed, just that there are changes. If I go back to the submodule and commit this file, then I get a different kind of message:
> git status
On branch main
Changes not staged for commit:
  (use "git add <file>..." to update what will be committed)
  (use "git restore <file>..." to discard changes in working directory)
        modified:   {submodule_repo} (new commits)
Now Git recognizes that the submodule has a new commit, but we haven’t updated the pointer in the main repo to point to that new commit. We need to make another commit in the project repo to update that pointer.
git add {submodule_repo}
git commit -m "Update Submodule"
Great - now the main repo and the submodule are in sync! But how do we push this update to our team? This is where things get tricky.
By default, git push will only push the current repo to its remote origin, but it will not push the submodule. You need to remember to do git push in the submodule directory too.
To review this change with your team, you need to create two pull requests - one in the submodule repo, and another in your main repo. If you need to make more changes in the submodule, you need to go through the whole process again:
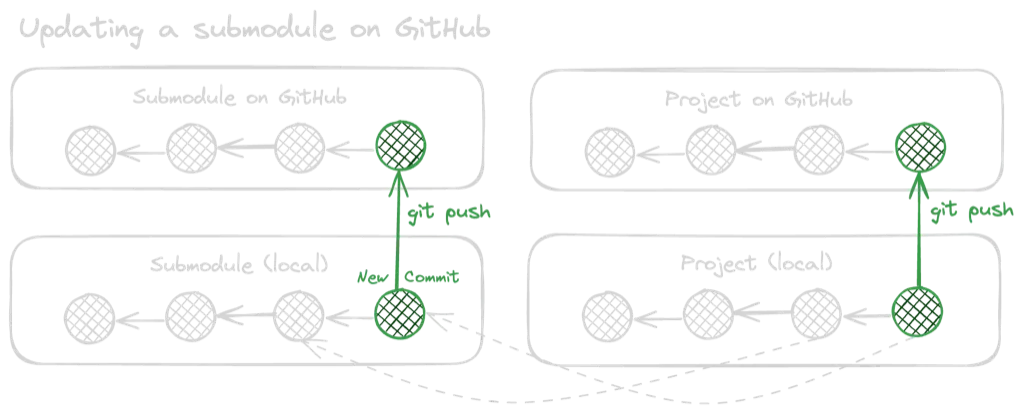
- Make a commit in the submodule
git pushthat commit.- Make a commit in your main repo
git pushthat commit.
Once you’re finished with your changes and you complete your two pull requests, it’s time for your team to pull your changes. First, they check out and pull the branch where you added the submodule.
> git switch main
> git pull
If they go looking for your newly added submodule, what they’ll notice is that the submodule directory is empty. To tell Git to recognize new submodules, use the git submodule init command.
git submodule initNow Git recognizes the submodule exists, but it hasn’t checked out any files. Each time you update the submodule with new commits, your team needs to run:
git submodule updateRead the Git Submodule documentation for additional commands.
Unity Packages
If the code or assets you want to share are in Unity, we highly recommend using Unity Packages over submodules. While they are a bit of work to set up, they are easier to version and will automatically keep your team in sync.
For reference, Unity has some good documentation for custom packages. In this example, we’ll create an “embedded” package, and then move it to a separate repository to be shared.
To create an embedded package, create a folder inside the Packages folder called com.{org}.{package-name}. Then, add this package.json file to it:
{
    "displayName": "Package Name",
    "description": "This package does XYZ",
    "name": "com.{org}.{package-name}",
    "unity": "2020.3",
    "version": "1.0.0",
    "category": "utilities"
}
Now, we can hop over to Unity and start adding assets to our package. Your package should appear as a folder in the Project window under the Packages section.

If you want to add code to your package, then you’ll also need to create an assembly definition file: Assets > Create > Assembly Definition. This ensures your package code is compiled separately from the main project. Learn more about Assembly Definition and packages.
Once you’re happy with your package, you can move it to its own repository, so it can be shared with other projects. Create a new repository and move the whole package into it.
If you want your package to be open source, you can use OpenUPM to distribute your package with the Unity open source community. Learn how to distribute your package with OpenUPM.
If you want to keep your package private, then you can use a Git reference to pull it into your Unity projects.
Open the Package Manager and go to + > Add package from git URL....
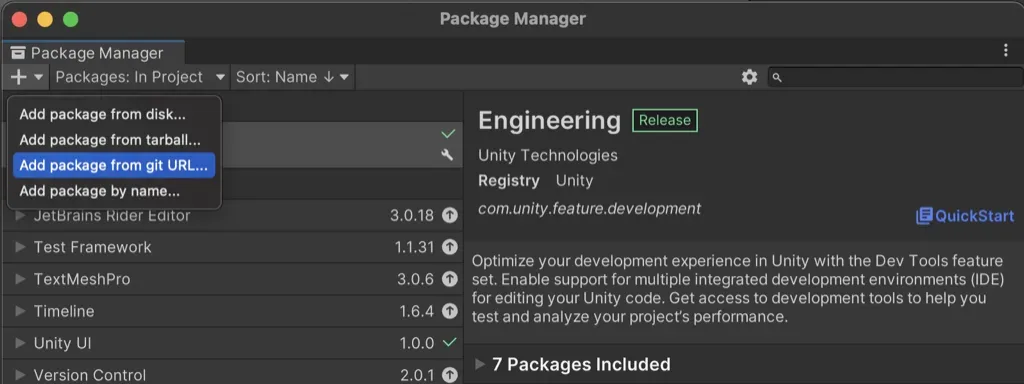
Copy and paste the URL to your package’s Git repository, and add .git on the end:
https://github.com/{org}/{repo}.gitIf all goes well, you’ll see your package in the Project window as before. Check which changes Unity made with git status:
git status
On branch main
Changes not staged for commit:
  (use "git add <file>..." to update what will be committed)
  (use "git restore <file>..." to discard changes in working directory)
        modified:   Packages/manifest.json
        modified:   Packages/packages-lock.json
Unity stores the list of packages you use in Packages/manifest.json. Here, you’ll find all of the built-in Unity packages and your newly added package. You can also see the same list of packages in the Package Manager window in Unity.
Also pay attention to the Packages/packages-lock.json file. This is where Unity stores the specific version of each package that your project uses. By tracking this file in Git, you can ensure your whole team is using the same version of every package and its dependencies.
Since you added your package from a Git URL, the packages-lock.json file will store the latest commit ID that Unity found when you added the package.
"com.virtualmaker.servicelocator": {
    "version": "https://github.com/virtual-maker-net/com.virtualmaker.sharedcode.git",
    "depth": 0,
    "source": "git",
    "dependencies": {},
    "hash": "ba0619eac92235362b45e791b70ac2637ce73900"
  },
The “hash” field is the commit ID. You can edit the packages-lock.json file directly to update the commit ID, but it’s usually better practice to specify the commit ID in the manifest.json file. For example:
"com.{org}.{package-name}": "https://github.com/{org}/{repo}.git#0fde24173316721063c9b46ec35fa8cf261e6531"A better way is to use git tags to version your package and pass in the specific tag name.
First, create and push a tag in your package’s repo:
> git tag 1.2.0
> git push --tags
Then, use it in manifest.json:
"com.{org}.{package-name}": "https://github.com/{org}/{repo}.git#1.2.0"Git on a Team: Branching Strategies for Unity
The way we’ve discussed branching so far is:
- Create
dev/branches for features and bug fixes. - Create pull requests from
dev/branches to themainbranch.

During development, this is usually an excellent strategy because it is simple to follow and keeps things organized. Before releasing your game, we recommend using this strategy exclusively.
You may be tempted to create branches for separate teams to work in. Avoid it if you can. Each team will be working on and testing a different version of the product, doubling your QA efforts. Merging those team branches also becomes a big chore and often results in regressions. You can end up with developers whose entire job is to merge branches together.
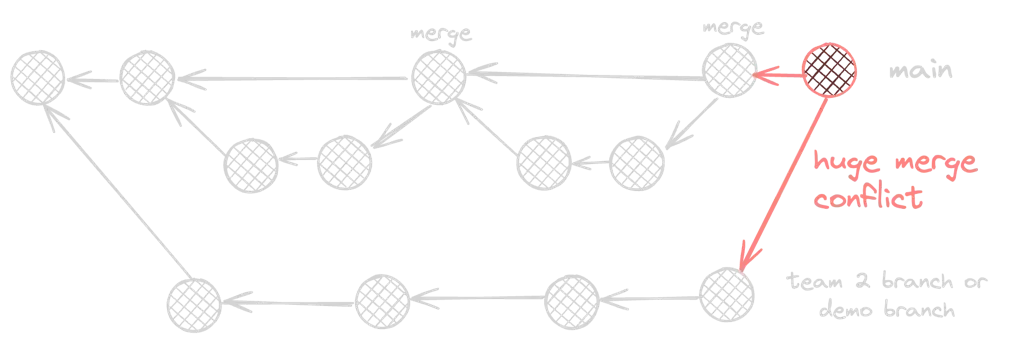
You may be also tempted to create a new branch for a demo. Resist the temptation — your demo branch will quickly drift from your main branch, and it will become impossible to merge back together. If you absolutely must create a demo branch, be prepared to throw away all work targeting that branch.
Release Tags
At some point, you’ll be ready to release your game. Congratulations!
As soon as you release, there become two versions of your game:
- The released version of your game
- The development version of your game, where you’re making bug fixes and feature updates.
You will want to keep track of the released version of your game for multiple reasons:
- You may want to debug an issue found only in the release version of your game.
- You may need to compare the release and development versions to diagnose regressions.
- In rare cases, you’ll need to apply an immediate hotfix to your game. The issue is so critical that you won’t be able to wait for the development version to stabilize for release.
Our strategy at Virtual Maker is to follow trunk-based development. Essentially, always keep your developers creating pull requests to the same branch (main).
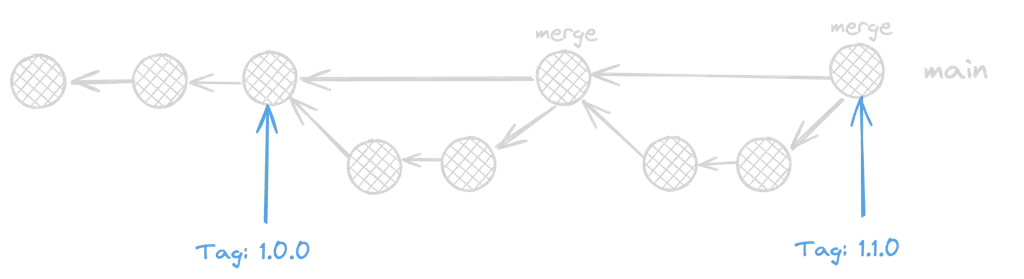
Each time you make a release, create a new version tag. This tag largely exists as a reference by your team. Developers can use the version tag to test bug reports and compare changes with the main branch. The ONLY time you should make a new branch from a release tag is for an emergency hotfix.
Automated Unity Builds and CI/CD with GitHub Actions
One of the best things about GitHub is the robust CI/CD infrastructure called GitHub Actions. Using actions, you can automatically:
- Build your Unity project for multiple platforms.
- Run unit tests
- Perform asset validation
- Perform style checking
- Deploy your game to one or more app stores.
Better yet, you can configure your actions to run on each pull request, forcing developers to fix issues before they even make it into the main build.
Unfortunately, setting up GitHub actions for Unity is complicated, to say the least. You need to deal with installing Unity, activating a Unity license, adding build extensions to the Unity editor, and more. Build Unity also takes a lot of compute time. Not only does that cost you money, but it makes your team’s pull requests drag on as developers wait for their changes to build.
But hope is not lost! Here at Virtual Maker, we’ve developed a solution…
Buildalon: The one-stop solution for Unity automation.
Further Reading
- How to Download and View Unity Logs from Your Game
- Automating Unity Builds with GitHub Actions
- How to Stream Unity Logs from Your Game
Subscribe to our Newsletter
Get the latest news and updates from Virtual Maker delivered straight to your inbox.
© 2026 Virtual Maker Corporation