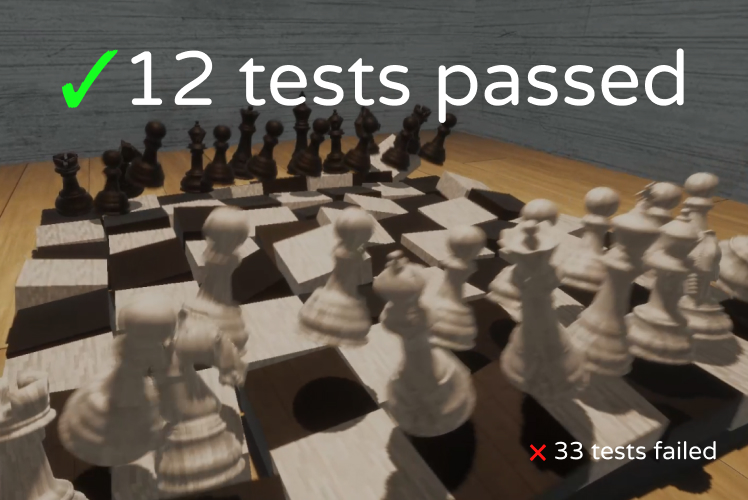
Let’s face it Unity developers — you write buggy code. I write buggy code. AI writes buggy code.
Many software engineers consider unit testing as the key to catching bugs early and preventing regressions. But do they work for Unity developers?
In this article, I’ll share with you how we do testing at Virtual Maker. We’ll learn the difference between unit tests, integration tests, and end-to-end tests, and why I think you should avoid writing the latter.
Then, we’ll dive into some code and learn how to write tests using the NUnit framework in Unity. To top it off, we’ll learn how to run tests from the command line and using GitHub Actions to truly automate the testing process.
Table of Contents
- Unit Testing at Virtual Maker
- Types of Tests
- Writing Tests in Unity using NUnit
- Edit Mode Tests
- Play Mode Tests
- Run Tests from the Command Line
- Running Tests in Automation using GitHub Actions
- Summary
Unit Testing at Virtual Maker
At Virtual Maker, we use unit testing to extensively test our Unity plugins and ensure they work in a variety of scenarios.
In Flexalon 3D Layouts, we test each layout component with different configurations and edge cases. Similarly, in Proxima Inspector, we test the protocol between Unity and the browser, to ensure that the right data is sent for each type of component and gameObject.
Flexalon 3D Layouts helps developers arrange 3D objects into lists, grids, circles, and more.
On top of ensuring that all edge cases work correctly, unit tests help us to prevent regressions. Whenever we fix bugs or add new features, we invariably introduce some new bugs.
To catch these, we set up our tests to run automatically whenever we make a pull request in GitHub, so any of these bugs are caught well before a change makes it in into a release.
But not all tests are created equal. In my past job at Microsoft, we spent a heck of a lot of time writing tests that didn’t catch any bugs. Worse, we wrote tests that were so brittle that we spent more time investigating issues and fixing the tests than actually working on the product.
So what makes one test good and another test bad?
Types of Tests
Often, what separates a good test from a bad test is a matter of scope. Ask yourself the question: how many components need to work correctly for a test to pass?
- Unit Tests: Test a single method or class in isolation.
- Integration Tests: Test the multiple components work together correctly.
- End-to-end Tests: Test that game features work as expected from as close to a player’s perspective as possible.
Unit Testing
Advocates for unit testing argue that tests should be as small as possible — test a single method or class in isolation. These tests are quick to run and easy to debug. For complex functions, especially math functions, they can also provide a lot of value.
For example, Proxima Inspector has a CircularList class that stores Unity logs so that you can see past logs after connecting the inspector. This class was tricky to get right, so we write some unit tests.
[Test]
public void EnumerableWrap()
{
    var list = new CircularList<int>(2); // Constructs a circular list with a size of 2
    list.Add(1);
    list.Add(2);
    list.Add(3);
    Assert.AreEqual(3, list.ItemsAdded);
    var items = list.ToList();
    Assert.AreEqual(2, items.Count);
    Assert.AreEqual(2, items[0]);
    Assert.AreEqual(3, items[1]);
}
This test checks that the CircularList class wraps around when it reaches its capacity. It adds three items to the list, then checks that the list only contains the last two items.
Integration Testing
Scoped unit testing is great for checking the behavior of complex functions and classes. But often, it’s not enough. In Flexalon, most of the difficult bugs come from the interactions between multiple Flexalon components.
In this case, we should think of how to test the Flexalon package as an isolated component.
How can we test this scenario? The test needs to:
- Create a scene.
- Add some gameObjects with Flexalon components.
- Have Flexalon run its layout.
Note
You can can still use a “unit testing framework” to write integration tests, or even end-to-end tests. Don’t look at me, I don’t make the rules.
Note
“Integration testing” can also refer to the integration between modules, processes, or even distributed computers. Here, I’m using the term to refer to the scope of the test as bigger than a single class or method. Think of testing a whole package or library.
Here’s an example of a real test from Flexalon:
[Test]
public void FillChild()
{
    // Create and configure a Flexible Layout
    var flex = CreateFlex();
    var flexObj = flex.GetComponent<FlexalonObject>();
    flexObj.Width = 3;

    // Add a child to the layout
    var child = CreateCube(flex.transform);
    var obj = child.AddComponent<FlexalonObject>();
    obj.WidthOfParent = 0.5f;

    // Add another child to the layout
    var child2 = CreateCube(flex.transform);

    // Update the layout
    Update();

    // Check the results
    AssertTransform(flex.transform);
    AssertTransform(child.transform, new Vector3(-0.5f, 0, 0));
    AssertTransform(child2.transform, new Vector3(0.5f, 0, 0));
}
Since there are many such tests, we wrote helper methods for common functionality: create Flexalon components, update the layout, and check the results.
Importantly, these tests run in edit mode. We don’t need to play the game to run these tests, and we don’t have to perform any asynchronous actions. Flexalon was designed this way so that it would be easy to test. By calling Update(), we force Flexalon to immediately process all layout updates, even though it would normally wait for the next frame.
This is key: write your components so they are easy to test in isolation. If your tests are not fast and reliable, they will quickly lose their value. This brings us to…
End-to-end Testing
In end-to-end testing, we try to test the product as a user would use it. Typically, this involves setting up some input simulation so that the test can act as a player, play the game, and then check the results.
With end-to-end tests, you can be sure that the product is really working as expected. By bother testing every edge of every component in isolation when you can just test the real player experience?
Or, so the thinking goes.
In reality, end-to-end are often slow, brittle, and hard to maintain.
Let’s use a simple example. Suppose you want to test that the player can change the volume. First, the player has to open the main menu, then drag the volume slider. What are the problems?
Slow: If an animation to open the main menu takes 2 seconds, then the test needs to wait 2 seconds. Multiply this by the number of tests that have to open the main menu.
Brittle: What if the animation takes a little longer to run because the test computer is slow? We aren’t trying to test performance here, yet the test will fail. What if the volume slider position changes depending on screen size? Eventually, you find yourself bending over backwards trying to stabilize the testing environment.
Hard to maintain: Suppose a designer decides to change the main menu animation to 3 seconds. Now all the tests that depend on the main menu need to be updated to wait for 3 seconds instead of 2.
Clever developers will try to circumvent these problems by adding features that make the tests faster and more reliably. For example, instead of waiting 2 seconds for an animation to play, we can add a special open-main-menu-completed event to the game that the test can wait for. Then, crank up the time scale to 10x speed so that the all animations complete in 0.2 seconds.
While the intentions here are good, the fallacy is that now developers are spending more time debugging tests and writing test infrastructure instead of improving the product. In one of my past projects, we actually spent more time debugging issues with the tests than we did with the product.
Ok, ok, but should I EVER write end-to-end tests?
Probably not.
Instead, design your app so that the parts that are difficult to get right can be tested in isolation. Leave the end-to-end testing to the humans. Or sentient AI, as the case may be.
Writing Tests in Unity using NUnit
Unity has a built-in unit testing framework called NUnit. To get started, you just need to install the NUnit package from the Unity Package Manager.
- Go to Window > Package Manager.
- In the Package Manager window, select Unity Registry from the dropdown.
- Search for NUnit and click Install on the NUnit package.
Edit Mode vs Play Mode Tests
In Unity, there are two type sof tests: edit mode tests and play mode tests.
Edit Mode Tests: These tests run within the Unity Editor. They are ideal for both unit tests and integration tests. Wherever possible, you should use edit mode tests.
Play Mode Tests: These tests can run in the Unit Editor in play mode or in a standalone player. These types of tests should be used as a last resort since they are slower and less reliable. Whenever possible, it is better to update your components to support edit mode tests than to write play mode tests.
Edit Mode Tests
For demonstration, we’ll use this simple SimpleCircleLayout component that arranges its children in a circle around its center.
This is a super simplified version of the FlexalonCircleLayout component, which has tests that are similar to the ones we’ll write here.
using UnityEngine;

public class SimpleCircleLayout : MonoBehaviour
{
    public float Radius = 2;

    public void LayoutChildren()
    {
        float angle = 0;

        foreach (Transform child in transform)
        {
            float x = Radius * Mathf.Cos(angle);
            float y = Radius * Mathf.Sin(angle);
            child.position = transform.position + new Vector3(x, y, 0);
            angle += 2 * Mathf.PI / transform.childCount;
        }
    }
}
Create a Assembly Definition for Edit Mode Tests
Before we can write tests, we need to create a special assembly where our tests will live.
- Open Window > General > Test Runner.
- If you don’t have any tests in your project you’ll see this:
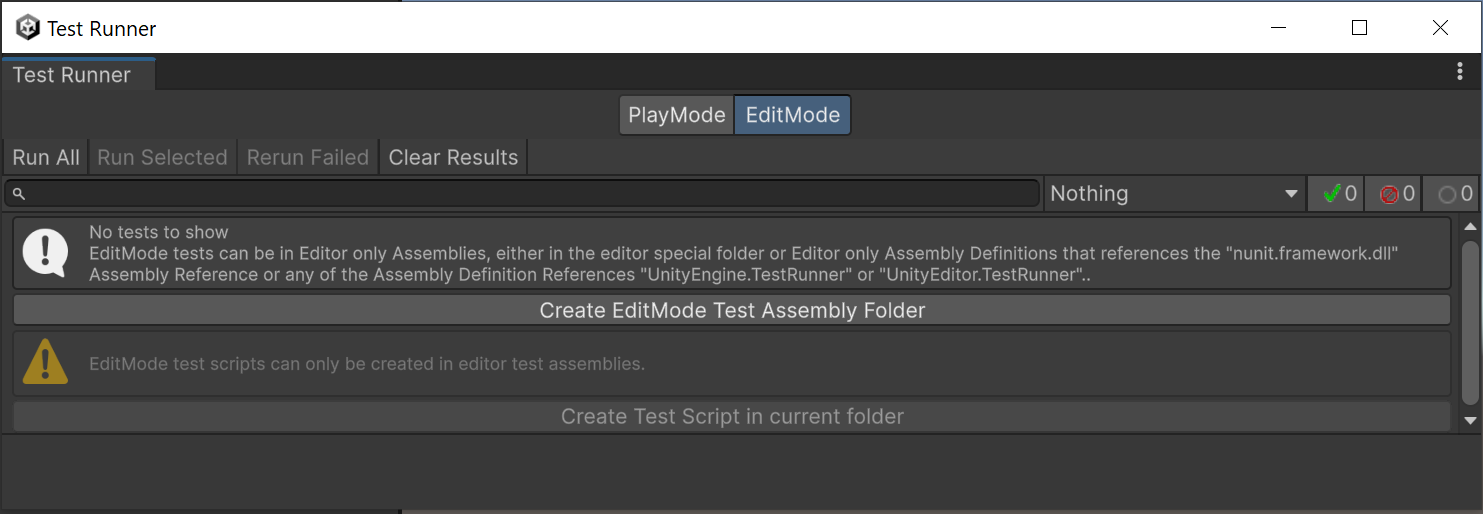
Click Create EditMode Test Assembly Folder. This will create a new “Tests” folder with an assembly definition file. You can rename this however you like.
In order to test your code, it needs to be in its own assembly definition file. If your script is in your main project, right click the Assets folder in the Project window and select Create > Assembly Definition.
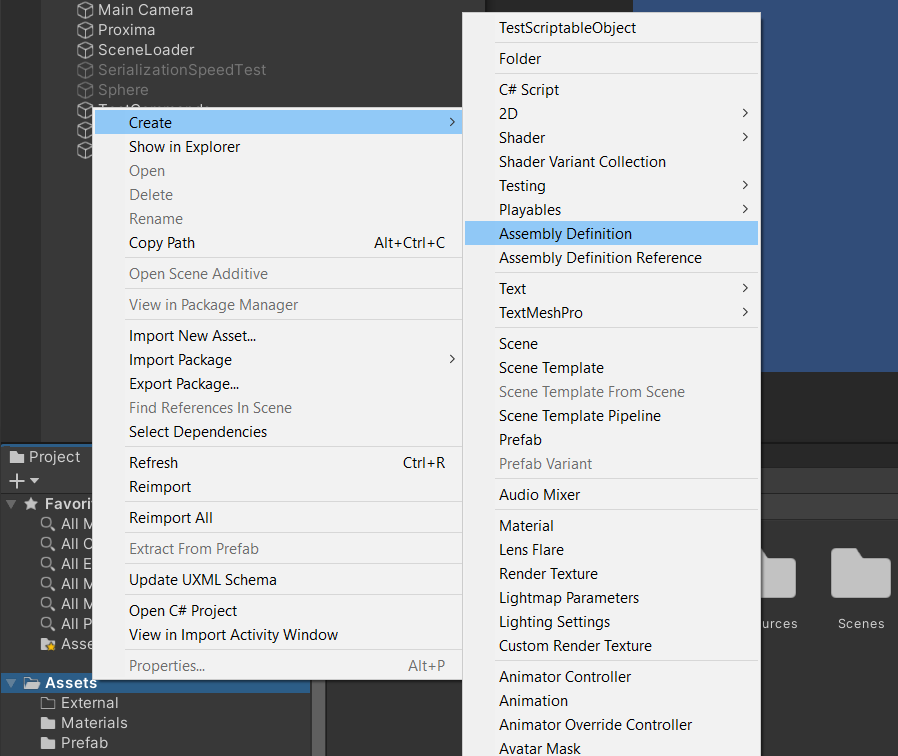
- Drag your assembly definition into the references of the test assembly definition.
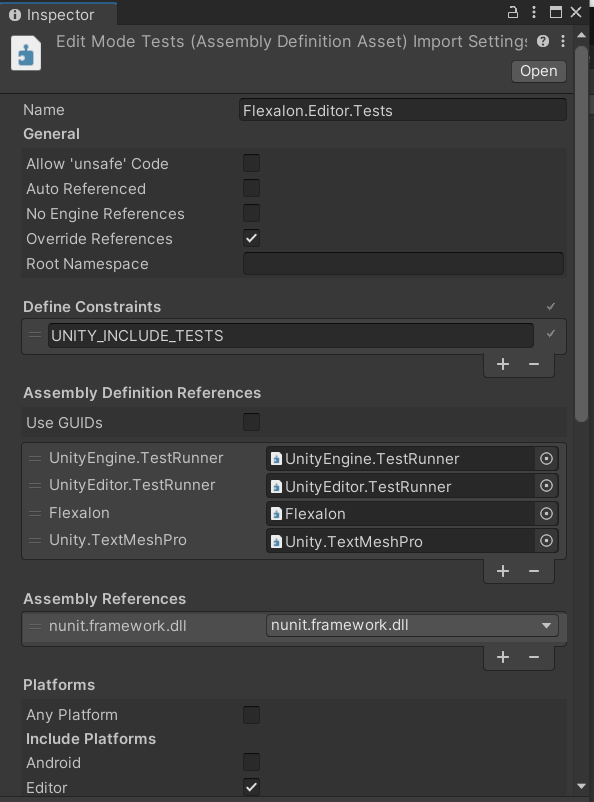
Here’s the final test assembly definition for Flexalon:
Write your Test Class
Now that we have our assembly set up, we can start writing tests. Create a new file called SimpleCircleLayoutTests.cs in your test folder, next to the assembly definition file.
using NUnit.Framework;
using UnityEngine;

[TestFixture]
public class SimpleCircleLayoutTests
{
    [Test]
    public void TestLayoutChildren()
    {
        var layout = new GameObject().AddComponent<SimpleCircleLayout>();
        layout.Radius = 2;

        var child1 = new GameObject().transform;
        var child2 = new GameObject().transform;
        var child3 = new GameObject().transform;

        child1.SetParent(layout.transform);
        child2.SetParent(layout.transform);
        child3.SetParent(layout.transform);

        layout.LayoutChildren();

        TestUtil.AssertVector3Equal(new Vector3(2, 0, 0), child1.position);
        TestUtil.AssertVector3Equal(new Vector3(-1, 1.73f, 0), child2.position);
        TestUtil.AssertVector3Equal(new Vector3(-1, -1.73f, 0), child3.position);
    }
}
In this first test, we create a SimpleCircleLayout component and add three child objects to it. We then call the LayoutChildren method and assert that the children are positioned correctly in a circle around the center. Finally, we use the Assert class to check if the positions are as expected.
You can add other tests by creating new methods with the [Test] attribute. Each test method should be self-contained and test a specific aspect of the component.
Running Edit Mode Tests
To run your edit mode tests, go to the Unity Test Runner window (Window > General > Test Runner) and click the Run All button. The test results will be displayed in the Test Runner window, showing you which tests passed and which failed.
You’ll notice, oddly, that the tests fail with the message:
TestLayoutChildren (0.012s)
---
Expected: (-1.00, 1.73, 0.00)
  But was:  (-1.00, 1.73, 0.00)
---
But why?
Improving equality tests for Vector3 and Quaternion
Unity’s Vector3 and Quaternion types are floating-point values, which can lead to precision issues. The actual Y value is not exactly 1.73, Unity is just printing out the first 2 digits after the decimal.
To address this, you can use a helper class to checks if the difference between two values is within a certain tolerance (0.01).
using NUnit.Framework;
using UnityEngine;
using UnityEngine.TestTools.Utils;

public class TestUtil
{
    private static Vector3EqualityComparer vector3Comparer = new(0.01f);
    private static QuaternionEqualityComparer quaternionComparer = new(0.01f);

    public static void AssertVector3Equal(Vector3 expected, Vector3 actual)
    {
        Assert.That(actual, Is.EqualTo(expected).Using(vector3Comparer), "Vectors are Equal");
    }

    public static void AssertQuaternionEqual(Quaternion expected, Quaternion actual)
    {
        Assert.That(actual, Is.EqualTo(expected).Using(quaternionComparer), "Quaternions are Equal");
    }
}
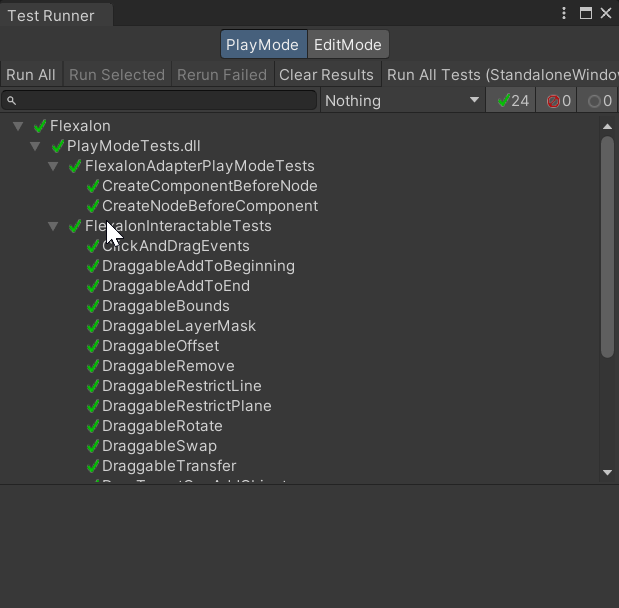
Now if we replace the Assert.AreEqual calls with TestUtil.AssertVector3Equal, the tests will pass.
Setup and Teardown
In some cases, you may find it convenient to perform common setup and teardown steps before and after each test. You can use the [SetUp] and [TearDown] attributes to mark methods that run before and after each test, respectively.
For example, suppose we want to test the circle layout with different numbers of children.
using NUnit.Framework;
using UnityEngine;

[TestFixture]
public class SimpleCircleLayoutTests
{
    private SimpleCircleLayout _layout;

    [SetUp]
    public void Setup()
    {
        _layout = new GameObject().AddComponent<SimpleCircleLayout>();
        _layout.Radius = 2;
    }

    [TearDown]
    public void Teardown()
    {
        GameObject.DestroyImmediate(_layout.gameObject);
    }

    [Test]
    public void TestOneChild()
    {
        var child = new GameObject().transform;
        child.SetParent(_layout.transform);

        _layout.LayoutChildren();

        TestUtil.AssertVector3Equal(new Vector3(2, 0, 0), child.position);
    }

    [Test]
    public void TestTwoChildren()
    {
        var child1 = new GameObject().transform;
        var child2 = new GameObject().transform;

        child1.SetParent(_layout.transform);
        child2.SetParent(_layout.transform);

        _layout.LayoutChildren();

        TestUtil.AssertVector3Equal(new Vector3(2, 0, 0), child1.position);
        TestUtil.AssertVector3Equal(new Vector3(-2, 0, 0), child2.position);
    }
}
In this example, the Setup method creates a new SimpleCircleLayout component before each test, and the Teardown method destroys it after each test. This ensures that each test starts with a clean slate and doesn’t interfere with other tests.
Test Attributes
Unity’s test framework provides several other attributes that you can use to organize and manage your tests effectively:
[TestFixture]: Indicates a class that contains tests.[Test]: Marks a method as a test.[SetUp]: Identifies a method that runs before each test. It’s used to set up conditions required for the tests.[TearDown]: Identifies a method that runs after each test. It’s used to clean up any resources or state.[OneTimeSetUp]: Runs once before all tests in the test class.[OneTimeTearDown]: Runs once after all tests in the test class.[UnityTest]: For play mode tests (read on below). This tells Unity to run the test as a coroutine.
Generally speaking, be wary of [OneTimeSetUp] and [OneTimeTearDown], as they can lead to dependencies between tests. For example, suppose we created the SimpleCircleLayout in [OneTimeSetUp] instead of [SetUp]. The same layout would be shared between all tests. If one test adds children and doesn’t clean up after itself, the next test would run with extra children, leading to unexpected failure.
Play Mode Tests
Play mode tests can run in the Unity Editor in play mode or in a standalone player. This can make play mode tests slow and brittle.
But there are some scenarios where play mode tests makes sense because the behavior you want to takes multiple frames to complete.
For example, Flexalon has a FlexalonInteractable component that allows the player to click and drag an object. We need to test that if the player clicks on the interactable and drags it out of a layout, then the object ends up in the correct position and the layout updates correctly. Here’s a real example:
Testing the VR grab interactables in Flexalon 3D Layouts
[UnityTest]
public IEnumerator DraggableRemove()
{
    var dragTarget = CreateDragTarget();
    var interactable1 = CreateInteractable(dragTarget.transform);
    var interactable2 = CreateInteractable(dragTarget.transform);

    yield return MoveFromTo(new Vector3(0.5f, 0, 0), new Vector3(2.5f, 0, 0));

    Assert.AreEqual(1, dragTarget.transform.childCount);
    Assert.IsTrue(interactable1.transform == dragTarget.transform.GetChild(0));
}
Indeed, these tests are the slowest and most brittle tests in Flexalon. In particular, the MoveFromTo helper function took some quite some time to get right. But we feel these tests are worth the tradeoff because they test a critical part of the product, and there are many possible edge cases.
Example that Requires Play Mode Tests
To demonstrate play mode tests, let’s add a RotateOnce component. The component will rotate a gameObject once and only once around the Z-axis over a duration.
using UnityEngine;

public class RotateOnce : MonoBehaviour
{
    public float Duration = 3.0f;

    private float _startTime;

    private void OnEnable()
    {
        _startTime = Time.time;
    }

    private void Update()
    {
        float t = (Time.time - _startTime) / Duration;
        transform.rotation = Quaternion.Euler(0, 0, Mathf.Lerp(0, 360, t));
    }
}
Create a Assembly Definition for Play Mode Tests
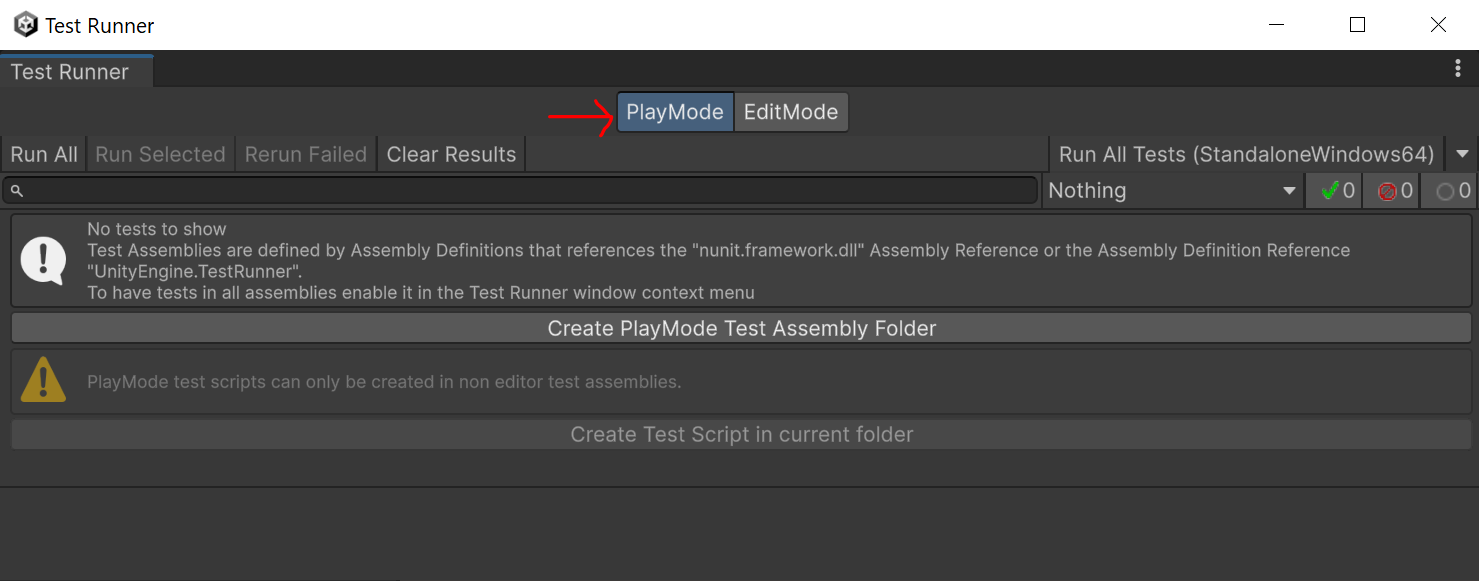
Play mode tests need to be in a separate assembly from edit mode tests, since they cannot reference the UnityEditor namespace. Follow the same steps as for edit mode tests, but this time click “Play Mode”.
Play Mode Test Basics
Now that we have our assembly set up, we can start writing play mode tests. Create a new file called RotateOnceTests.cs in your test folder, next to the assembly definition file.
using NUnit.Framework;
using UnityEngine;

[TestFixture]
public class RotateOnceTests
{
    [UnityTest]
    public IEnumerator TestRotateOnce()
    {
        var rotateOnce = new GameObject().AddComponent<RotateOnce>();
        rotateOnce.Duration = 3.0f;

        yield return new WaitForSeconds(1f);

        TestUtil.AssertQuaternionEqual(Quaternion.Euler(0, 0, 120), rotateOnce.transform.rotation);

        yield return new WaitForSeconds(1f);

        TestUtil.AssertQuaternionEqual(Quaternion.Euler(0, 0, 240), rotateOnce.transform.rotation);

        yield return new WaitForSeconds(1f);

        TestUtil.AssertQuaternionEqual(Quaternion.Euler(0, 0, 360), rotateOnce.transform.rotation);

        yield return new WaitForSeconds(1f);

        // Make sure it only rotates once!
        TestUtil.AssertQuaternionEqual(Quaternion.Euler(0, 0, 360), rotateOnce.transform.rotation);
    }
}
In this test, we create a RotateOnce component that will rotate once over 3 seconds, and then check the rotation at different points in time.
For this test to work, we need to use the [UnityTest] attribute instead of [Test] and change the return type to IEnumerator. This treats the method as a coroutine, and you can use yield return to perform asynchronous operations. Learn more about coroutines in Unity.
Running Play Mode Tests
To run your play mode tests, go to the Unity Test Runner window (Window > General > Test Runner) and select PlayMode from the dropdown. Click the Run All button to run the tests. The test results will be displayed in the Test Runner window, showing you which tests passed and which failed.

Tip
If you add
Debug.Logstatements to your test, they’ll appear in the test results. This can be helpful for debugging failing tests.
Run Tests from the Command Line
Running tests manually is fine for small projects, but as your project grows, you’ll want to automate your tests to catch issues early and ensure consistent quality. Unity provides command line options to run tests, allowing you to integrate them into your build pipeline or continuous integration (CI) system.
To run your tests from the command line, use the -runTests argument followed by the -testPlatform to specify where to run the tests (EditMode or PlayMode).
Unity.exe -batchmode -nographics -runTests -projectPath "path/to/your/project" -testPlatform EditModeNote
Do not pass the
-quitflag to the command line, as it will quit Unity before any tests run. NUnit will automatically quit Unity after the tests are done.
There are additional options that you can use to filter which tests to run. See the full list of command line arguments.
Analyzing Test Results
The command will generate a file named something like TestResults-638683971208353675.xml in your project root directory, which you can inspect to see the results of your test. For example:
<test-case id="1305" name="Collider2DFixedAndComponent" fullname="FlexalonAdapterTests.Collider2DFixedAndComponent" methodname="Collider2DFixedAndComponent" classname="FlexalonAdapterTests" runstate="Runnable" seed="4201476" result="Passed" start-time="2024-11-26 03:42:24Z" end-time="2024-11-26 03:42:24Z" duration="0.001536" asserts="0">Here we see the result of test FlexalonAdapterTests.Collider2DFixedAndComponent with result="Passed".
Running Tests in Automation using GitHub Actions
Now that we know how to run tests from the command line, you can easily add it to any continuous integrate (CI) pipeline that you have set up.
If you’re using GitHub actions, we wrote the article Automating Unity Builds with GitHub Actions that will help you get started.
You can then update your workflow file to run the tests. We recommend injecting this after the Project Validation step:
name: Run Edit Mode Tests
using: buildalon/unity-action@v1
  with:
    build-target: ${{ matrix.build-target }}
    args: -runTests -batchmode -testPlatform EditMode -testResults "${{ env.UNITY_PROJECT_PATH }}/Logs/EditMode-test-results.xml"
    log-name: EditMode-Tests
You also need to update the actions/upload-artifacts step to add the test results to the uploaded artifacts:
- uses: actions/upload-artifact@v4
  # ...
  with:
    # ...
    path: |
      ${{ github.workspace }}/**/*.xml # <- ADD THIS LINE
      # ...
Summary
The Unity NUnit package provides a powerful way to write tests to prevent bugs in your project. We covered the differences between unit testing, integration testing, and end-to-end testing, and when it’s appropriate to use each.
We also learned how to write edit mode tests and play mode tests, and how to run them from the command line or in automation using GitHub Actions.
Armed with this knowledge, I expect bug free code from you from now on.
Go forth and test!
Further Reading
- Git and Unity: A Comprehensive Guide to Version Control for Game Devs
- How to Stream Unity Logs from Your Game
- How to Download and View Unity Logs from Your Game
Subscribe to our Newsletter
Get the latest news and updates from Virtual Maker delivered straight to your inbox.
© 2025 Virtual Maker Corporation


